
Your Guide to Digitally Storing Your Wedding Photos
Your wedding is one of the most if not the most memorable event of your life, and the photographs taken on your special day should serve as a record of this momentous occasion that can be enjoyed for generations to come. However, failure to digitally archive and properly store your wedding photos could potentially result in losing them forever.
Throughout my over 25 years of experience as a wedding, lifestyle, and journalistic photographer, I’ve personally witnessed numerous hard drive failures, unreadable USBs, and other unforeseen storage failures that would have otherwise been disastrous if it hadn’t been for my diligent archiving practices. That’s why I want to share my recommendations for safely and securely storing your precious wedding photos so that you never have to experience the heartbreak of permanently losing your precious memories.
In this post, I’ll walk you through the basics of file storage options, best practices, and provide some additional digital archiving tips and tricks I recommend to all of my clients who want to safely and securely digitally store their wedding photos.

An Important Note About Image Resolution and Why it Matters
First, I want to offer a caveat: You may think you have your photos saved because they’re uploaded to your Facebook or Instagram, but that’s unfortunately not the case. These platforms are great for sharing your wedding photos with your social circle, but this is not the same as safely storing them for the long-term.
The reality is, Facebook and other social media sites downsize the resolution of the images, digitally compressing it and drastically reducing the image quality. This makes it so they will load faster online but they are not ideal for printing.
What Does High Resolution Mean?
High resolution refers to images that have more pixels per inch (PPI), which means that there’s more information stored in the image file, creating a clear, crisp image that doesn’t have any blurring, grain, or pixelation. These images are ideal for printing out and giving to friends and family.
Even if an image looks fine on your phone screen if you were to print an image from Facebook onto an 8x10” glossy archival print for a relative to put on their mantle, you won’t have the same crispness as the original high-resolution version, and it will appear blurry and pixelated. That’s why you want to save the original high-resolution versions provided by your wedding photographer properly and have backups.

Why You Need to Back Up Your Wedding Photos in Multiple Locations and Formats
The worst can happen, and you don’t want a single point of failure to stand between you and losing your photographs, potentially forever. You should have your photos backed up in at least one other location, but in reality, I recommend 5. It might seem like overkill, but you don’t want to put all your eggs in one basket when it comes to irreplaceable photos.
In addition, technology changes at a rapid pace, and what was once the standard storage practice may no longer be the case 5 years from now. Case in point, it wasn’t too long ago that USB drives were the preferred method for people to share files back and forth. Now, with devices no longer offering USB ports as well as the susceptibility of USB drives themselves to lose their quality and become corrupted over time, they’ve fallen out of favor. If all of your files are stored on degrading USB drives, the quality of your image files could be irreparably damaged. Why take that chance?
Your Options for Storing Your Wedding Photos
It’s critical that you safely and securely backup and archive your photos at the highest resolution that they can so that you can guarantee that you will have access to them over the years. Since there’s not one specific foolproof way to store your photos that won’t break down, that’s why I recommend diversifying between several different forms of storage.
Here is a list of storage options for you to choose from. Mix and match between these options, or even duplicate a couple of the same kind, for example, two external hard drives. The important thing is that you save multiple copies of your wedding photos.
Cloud Storage
One of the most common ways to store files is in the cloud via one of several well-known cloud services, including Google Photos, Amazon Photos, Dropbox, and Apple iCloud, all of which automatically backup your files. By storing your photos in the cloud, it can provide immense peace of mind to know that if something happens to one of your tangible devices, you always have a backup.
All of these services are free from the start with options to upgrade to more storage space for a monthly or annual fee, which can vary in price anywhere between $0.99/month for 50 GB of space to $99/year for two terabytes (TB) depending on which platform you choose.
I myself use Amazon Prime Photos, but you’ll want to examine the details, features, and limitations of each service and go with the one you like best, as all options have their pros and cons. For example, Google Photos will downsize photos larger than 16 megapixels, which for many people isn’t a dealbreaker, but for some photographers is unacceptable. For size reference, your smartphone can capture 16-megapixel photos, but chances are that the wedding photos you receive from your photographer will be much larger.
Amazon Prime Photos requires you to have an Amazon Prime account, but you get free, unlimited storage, plus the ability to store RAW images, which are the high-quality files your photographer has that allows for easier color editing. Dropbox is fairly popular for people of all levels of technical ability but is one of the pricier options when it comes to their storage upgrades, offering one TB for $9.99/month, or $99/year.
Fellow photographers and other advanced users may want to also consider more robust, photo-specific organization software packages, including apps by ACDSee, Mylio, and Adobe, which all include cloud storage.
External Hard Drive
External hard drives act like your computer’s built-in storage capability but are separate, portable, and connected externally. Most can hook up to your computer via a USB connector, though other connector types and cords are available depending on your specific needs. They also work great between computers that use different operating systems, so if you want to share files from your Mac with your friend who has a PC, you don’t have to worry about it being formatted for one system or another, unlike many of the older USB drives.
The sizes and prices of external hard drives can also vary, from around $50 for 1-2 TB of data, to $350 and up for 8 TB and higher. You can dedicate a couple of smaller, less expensive external hard drives for just your wedding photos and store them in a water or fireproof safe for added security.
For further information on how to choose a good external hard drive, check out this roundup comparison of different drive sizes and price points here on Wirecutter, a product-review site by the New York Times.
Digitizing Prints, Slides, and Negatives
While most of today’s wedding photos are digital, you can and should also back up your older photographs in the same manner so you always have a digital copy of your prints. With digital copies of your collections of prints, photo albums, slides, and negatives, you can rest assured that your historical archives and family memories from generations past are preserved no matter what.
Because they’re physical copies, you will first need to digitize them by scanning them. If you have a scanner of your own, this can be time-consuming, but there are also scanning services you can hire to do it for you.
Have A Backup Of Your Backup
Whichever combination of systems you select to backup your photos, it’s important to regularly monitor the system and check to make sure it’s backing up your photos correctly. I also recommend always having a backup of your backup, which can seem redundant, but you can never be too prepared when it comes to irreplaceable photos.
Software that uses your computer’s operating system and runs in the background, such as Apple’s Time Machine or Backblaze, automatically syncs your files to the cloud. These are great because they are literally “set it and forget it”, as it’s passively saving your files without you having to think about it. You can also dedicate one of your external hard drives to store one of these archives, adding an extra layer of safety.

Additional Tips for How to Organize Your Backup Files
Now that you have your backup systems chosen, how do you organize everything so you can find it? Here are some organizational tips to consider.
• Label your folders: If your chosen storage platform allows you to store your photos in folders, clearly name them with the occasion, date, or any other identifying information so you can quickly identify what is in each folder.
• Keep a folder of your favorite pictures: Like your “favorites” on your phone, it’s good to have a folder that only contains duplicate copies of your favorite images, clearly labeled as such. That way you can easily reference the ones you like best and have them ready to go at a moment’s notice if you want to print them out or share them.
• Add context to your photos: Whether by clearly naming each image file, adding captions, creating labeled sub-folders, or even a text file reference in each folder, you should write a short description of the occasion, folder contents, and any other specific information about the photos. It’s easy to forget the details, so it doesn’t hurt to have a reminder to jog your memory when you uncover these photos later and want to know more.
• Start small: Outside of the bulk upload and backup, it can feel really overwhelming to organize, label, and contextualize your entire photo collection at once. Start by doing a little bit at a time, starting with your most recent images and working backwards a little at a time day by day, week by week. That way, it will be an easier process to follow going forward.
• Test your backup periodically: I’ve already mentioned it several times, but that’s because it’s an extremely important tip to remember: periodically check, test, and monitor your chosen backup systems to make sure they’re working properly. Each system is different, so you might not always realize when something stops syncing, and you could think everything’s working as it should for months, but nothing’s actually archived.
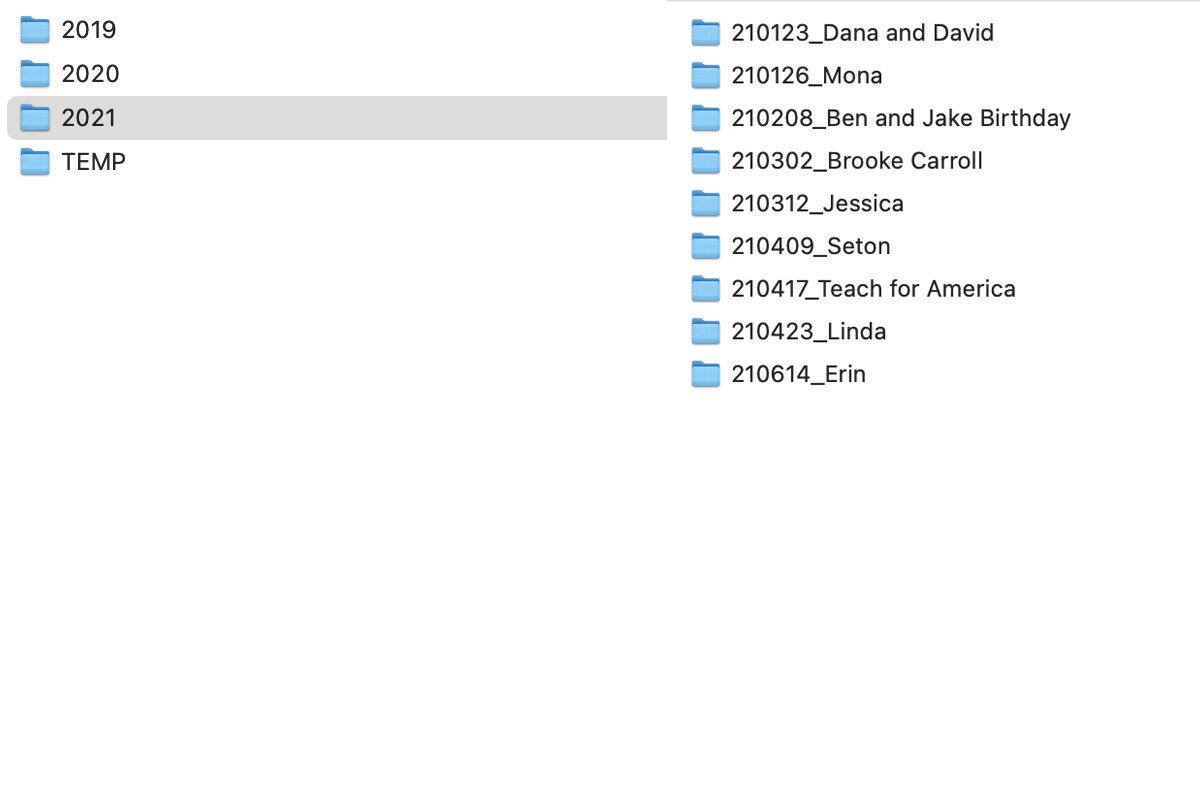
For inspiration on how to get started in organizing, labeling, and storing your photos, here’s a screenshot of my own naming conventions and system so you can get an idea of how it looks in context.
Storage Steps You Need to Take Immediately After You Receive Your Wedding Photos
Now that you know how to properly store your photos, here’s a recap of what you should do immediately after you receive your photos from your photographer.
Download your photos to a hard drive
Make sure all of your files are there and that everything downloaded successfully
Immediately make copies in a couple of different places, for example, at least one external hard drive and a few cloud-based storage locations
It’s worth noting that while your photographer may keep backups of all of their client’s photos, it’s never a guarantee. Some photographers will charge a nominal fee to provide you with a backup, so it’s important that you download your photos right away once you receive a link to your digital gallery.
Establishing good archiving practices can go beyond your wedding photos, as these recommendations are great file storage hygiene tips that can be applied to all of your digital files. Once you figure out a system that works for you, you can rest assured knowing that your important data is safe, secure, and easily accessible.